Wednesday, March 11, 2009

Montessori School Mid-Term Review

The architecture seeks to reclaim dense urban interstitial space through an intervention between towers. Spontaneity of the Montessori process is expressed through spatial representation, or the void, while the positive space creates the necessary enclosure. The project introduces certain sustainable practices such as traffic decongestion, urban renewal, robust structural systems, etc. The porous technique applied to the seemingly regular box allows for light penetration, wind load reduction, and a cool effect to say the least. It’s not a duck, but it will do.

Just finished the first half of the project - thought I would post some of the presentation images-

_quick renders:

Picture1 Picture2 Picture3 Picture4 Picture5

_site

 Picture6Picture15

_plan

 Picture7 Picture8 Picture9 Picture11Picture10

_elevation

 Picture12 Picture13 Picture14

leave thoughts in the comments-

How To Create a Curtain Wall in McNeal’s Rhino modeler

Recently I spent a good bit of time trying to figure out how to do mullions on irregular surfaces using McNeal’s Rhino software. There really wasn’t any good information on a way to do this posted online, so I’ve included my technique below for anyone who needs it.

I started by trying to do a series of fins (curve offset in the direction of the normal of a surface) but it couldn’t, without some scripting, be batched. So I abandoned the idea…

I also considered using Revit, but the surfaces were a bit complex and the solution Revit presented was not so elegant – a disappointment I had anticipated. There is a good video on Revit/Rhino workflow if you’re interested here (thanks Jeremy).

To get a good window mullion, including size control, the best way to go about it is by first applying a window mullion pattern to a UV curve, applying the curve to the surface, and offsetting the surface (thanks Jeremy) using both directions and volume capped options enabled. Just extrude the mullion half of what the total width is and because it will extrude in both directions the mullion will be expressed on both the inside and outside of the curtain wall.

For the sake of the tutorial, I’m going to assume that you know about UV curves in rhino. I wrote a tutorial on UV curves for a class I had last semester – I’ll try to post it later as another tutorial sometime in the near future.


Step Null: Starting Condition

 01 Surface Condition


Step One: Create Mullion Pattern on UV Curve

To create a UV Curve, go to Curve –> Curve From Objects –> Create UV Curve

Create a pattern based on the height of the mullion. Array the pattern to save time if necessary. Also be sure to give the mullion pattern a sill/header mullion condition on all sides.

  03 Pattern


Step Two: Apply UV Curve

Curve –> Curve From Objects –> Apply UV Curve
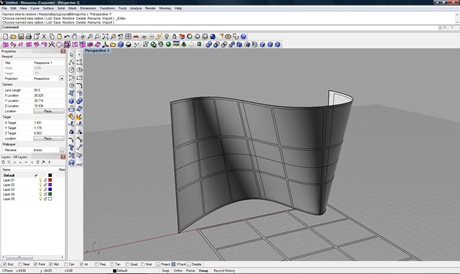
05 Applied UV Curve Condition


Step Three: Split All Objects

Just type Split into the command bar and select both the old surface as well as the new mullion surface. For the split to work best, only split one surface at a time, and try not to select geometries which extend past the surface edge. To fix the “extended geometry” condition, simply trim the geometry by using the surface as a cutting plane.


Step Four: Layer Control

Be sure to move the polysurface to a mullion layer before and after the extrusion.
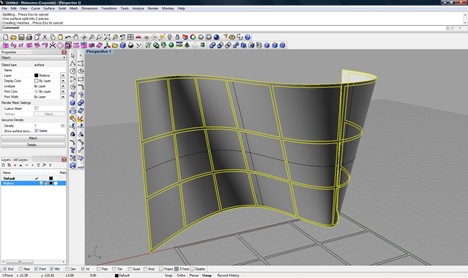
06 Layer Control

Step Five: Extrude Mullion Surface (both directions = yes, capped = yes)

Again, ensure that the surface and the mullion layer are separate. This will help in the future as you work with multiple non-regular curtain wall conditions.

Final Results:

07 Final Product

_________________________________________________________

And that should be it. See the curtain wall condition in one of my current projects to get an idea of how convoluted these situations really can become:
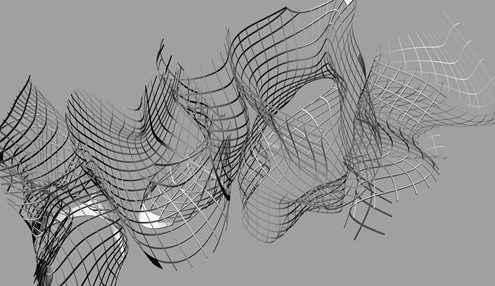
Curtainwall Condition

If you need the corresponding file from above, or have a question, feel free to shoot me an email, or leave it in the comments-

Sunday, March 8, 2009

Levitation and the Literal

I was reading Wired News when I came across a hovercraft designed by Kazim Doku. Sure it’s a concept, and a very cool artifact (if it were to be produced), but the importance of such investigations are quite relevant to architectural discourse.

As we contemplate the emergence of a Wölfflin neo-Baroque period (even Jimenez Lai agreed with me in saying that we’re all acting like mannerist…) in which the painterly effect and levitation dominate our sensibilities, the act of literal levitation is quite compelling.

Imagine how would you design a building (or, well, anything) if gravity were not a real dominating force-

 audi_shark03_sized audi_shark02_sized audi_shark02_sized_2


Kinda brings out the Star Wars in all of us…

…and I don’t think the leather costume is included….Just a thought.

Images/Video are completely ripped off the Wired site, who ripped them off of Doku. Needless to say, none of the graphics are mine. Hope that clarifies all of it-

Friday, March 6, 2009

Adobe Kuler

I, for one, am not a color person. I like grey, black, white, and red (as you can tell from the background). However, there are cases where a smart use of color can really help. So for those of us who are color challenged, I will today discuss project Kuler by your friends at Adobe.

Kuler is a setup which allows the user to either create a color palette from rules based on basic color theory or choose a pre-made color palette from Adobe or another user. Kuler will also create a palette based on a photo. As shown below, each palette provides more color data than you probably need.

kuler photoshop 3

In addition there is also a color pulse which is, according to the site, “a big picture view of color.” This allows the user to see a diagram of world color use via a color wheel dot diagram. On the right side of the panel is a histogram summarizing the dot diagram. I think both are very cool.

kuler photoshop 4

In addition to all this, which is only available online or through the Adobe desktop AIR applet, Adobe has provided the tool inside Photoshop. Basically, they’ve taken all the fluff out of the website applet and coded it straight into the software. Find it at Window > Extensions > Kuler. Very cool.

kuler photoshop kuler photoshop 2

Wednesday, March 4, 2009

Tracery AEffect _preliminaries

These are the boards the team and I have been working on as a fabrication project at A&M. I just thought they looked amazing and I wanted to post them.

The project is really about the pliant and the Affect, with the architecturalization of the work being faceted and porous.
The whole thing is an experiment in materials and scripting. I'll let you know more as things develop-


graphics/code by jeremy harper.

let me know what you think in the comments-

If you're going to use pdf...

I have a professor who is using PDF to distribute scanned text for the class to read and review. Each file is around 10 megs or larger, and after a bit of modification, the files can be reduced (with no apparent quality loss) to around 1 meg, saving space in the cache, download times, etc.

Anyway, this may not be the most interesting topic, but there is a best practices on how to scan/distribute pdf, so I thought I would pass on a solution:

1. Straighten the text by using OCR Text Recognition.

After the document is scanned, use the batch tool OCR Text Recognition (Document -> OCR Text Recognition -> Recognize Text Using OCR). This allows for all text in the document to be converted from a raster (image) format to a searchable, highlightable format. It also rotates each document page so the text is easier to read.

2. Use reduce file size.


Perhaps the most efficient way to make the largest impact in reducing pdf file size is the reduce file size option located in Acrobat (Document -> Reduce File Size...). Do this after step one because it sometimes will cause step one not to work - this is especially irritating after you've saved over the older, bloated file. I recommend saving the new file with a "_reduced" ending on the name (oldfile_reduced.pdf) until after all pdf processing is complete.

3. Allow all users to highlight the now searchable text by Enable for Commenting and Analysis in Adobe Reader...

Since the document will be used in the future by all students, not just those with Acrobat, why not enable the highlighting/comment/strikethrough/etc. feature for them as well. To do this, on the machine with Acrobat, go to Comments -> Enable for Commenting and Analysis in Adobe Reader.... Once completed, save the file down as the final save. To enable commenting in Reader, Right-Click in the bar at the top with all the buttons and check on the commenting tools.

Now all readers can annotate and search the now rotated document in a reduced file size format. Cool.

If you have any suggestions, leave them in the comments -

Sunday, February 1, 2009

Thinkering Space

Picture10

This project seeks to redefine the idea of “thinkering space.”

Greg Toppo argues the thinkering space as one cure for the growing “complexity gap” in students educated under the no child left behind program. Because students have up to this point been focused solely on quantitative goals such as reading and writing, and not qualitative learning such as art, design, music, etc. the ability to critically think in abstract terms has been lost. Quantitative logic without qualitative logic proves inadequate over the long term.

This project proposes an interactive, topological space for digital play – inclusive of touch walls, sensispheres, and multi-touch in an interactive, fully immersive digital environment.

Such a condition creates new level of spontaneity which allows for interpersonal conditions to emerge. The space is designed to be installed inside, but it is otherwise site independent. The surface articulation, using morphological geometry, is purely performative and aesthetic.

Peter Sloterdijk via wikipedia.com: “Spheres is about ‘spaces of coexistence’, spaces commonly overlooked or taken for granted that conceal information crucial to developing an understanding of the human. The exploration of these spheres begins with the basic difference between mammals and other animals: the biological and utopian comfort of the mother's womb, which humans try to recreate through science, ideology, and religion.”

Geometrically speaking, the space, via the “blended” spheres, allows for a more pliant, woven condition between the various matters of existence which provide for the intellectual stimulation of the participant. Such programmatic overlap allows for the emergence of new programs which are generated by the participant through hands-on interaction with the digital aspect of the space as well as a blending affect will allow for certain environments to bleed over into other environments creating interaction not only between the participant and the space but the space and the space itself - a programmatic lava lamp if you will.

perspective showing the Coliseum “bleeding” into the solarium

Picture11

interior perspective – notice the Coliseum on the left and the solarium on the right

Picture12

plan showing interior spaces | plan showing surface pattern articulation

Picture7 Picture8

elevation

Picture9

preliminary studiesPicture5

Picture4Picture6

Picture2 Picture3

morphoginic surface porosity script (much thanks to Jeremy Harper)ARCH 606 Thinkering Final Presentation Script