Showing posts with label How To. Show all posts

Wednesday, August 1, 2012

Import NURBS geometry cleanly from Rhino into Maya

Moving geometry in and out of Maya can be difficult, especially moving geometry in a useable format between the two platforms. There have been attempts to move the geometry through a number of mediums, including .iges, .obj, .dwg, etc. I’ve found the majority of these to fall short in the face of highly articulated geometries. Rhino provides certain benefits over Maya, such as grasshopper and fabrication compatibility, but lacks much of the mesh control provided for in Maya.

In order to maintain the fidelity of the NURBS geometry, knowing that the geometry will be further worked in Maya, do the following:

  1. Select NURBS object in Rhino. Run the command : ExtractControlPolygon. Move the polygon mesh away from the original NURBS geometry.
  2. Export the object out of Rhino in the “wavefront OBJ” format.
  3. Open the object in Maya.
  4. Subdivide as needed. Done.

The upper screenshot below is of a surface in Rhino. The left geometry is a NURBS surface. The right geometry is the control polygon.

In the lower image is import geometry in Maya. The mesh on the right is the control polygon imported from Rhino. The surface on the right is a subdivided mesh straight from the control polygon (press “3” in the software…). Note that they are identical.

The only shortcoming of this method is that it only exports a single surface at a time, so if there is any mass to your NURBS model, each surface will need to be extracted and exported separately.

rhino_control surface

maya_export_blog

Wednesday, April 8, 2009

A Rhinoceros with Fins on Stairs

I was asked today to do a short tutorial on a little known yet valuable command in Rhino called Fin.

Fin, according to the help manual, “Creates a surface by extruding a curve on a surface, normal to the surface.” The practical example below will use the fin command to create stair a simple staircase based on bent geometry.

Problem: This technique will not work with an applied UV curve nor geometry which has been oriented to a predefined surface; in both instances the threads on the staircase become skewed. When offsetting a polyline which has been through bend, etc. the offset will not be fully realized, so offset/loft wont work either.

Also note that this is not for wild, topological stairs (which may or may never be used/built/whatever), but is for using very controlled geometries to create stairs which someone on a cane might use.

1. Create staircase geometry (lines). JOIN them all together as one line.

image

2. Manipulate by the ROTATE/BEND/TWIST commands to desired state.

image

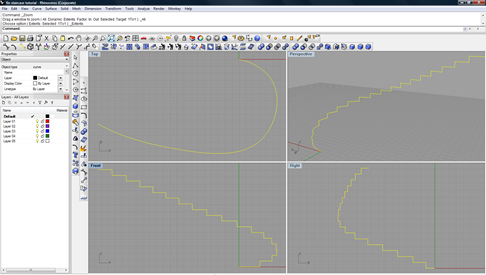
3. Use interpolated curves along the top edge of the stairs, so that the curve your creating follows the curve of staircase. Copy this new curve vertically above and below the stair geometry. Connect these two new lines with single straight line. SWEEP2 the two curves and the straight line to create a surface parallel but larger than the new staircase geometry.

image

4. FIN the staircase curved polyline. Select the surface created in step 3 as the surface as the “base surface.”

image

5. Erase/Delete the construction curves and surfaces to complete staircase.

image

Also know that you can build stairs using Grasshopper, if that’s your thing.

Leave questions in the comments-

Tuesday, April 7, 2009

A Short Criticism of RealFlow

[image[27].png]Just as fitting a round peg through a square hole can yield obstacles, using particle simulation software to model architectural environments can sometimes prove aggravating. I have a few criticisms:

1. The OBJ export always leaves holes in the mesh (same with the LWO export). Even after using extremely fine polygon sizes and using the fill all mesh holes script in Rhino, the model still has holes. Needless to say, you can’t send it through for rapid prototyping…

2. When you insert a mesh, you can’t turn off the mesh for further particle creation: every subsequent scene exports the corresponding mesh, which can take forever. To fix the problem, you could delete the mesh, but then you loose the node parameters set up for both the mesh and the fluids inside the mesh. If there was a way to temporarily “turn off” the mesh object (a la Rhino/AutoCAD/etc.) it would essentially solve the problem. I have a solution for this, but its not very elegant. I’ll try posting it in a later post.

screenshot.2

3. RealFlow has the elegant interface help solution which allows for you to highlight a node parameter  and press F2 to pop up a short help summary of the parameter. However, if you hit F1 a tiny window pops up and, upon closing said small window the whole program crashes.

4. When you close RealFlow, the program acts like its crashing. Not a bid deal, but it makes you feel uneasy about using the software for in-production work.


Wednesday, March 11, 2009

How To Create a Curtain Wall in McNeal’s Rhino modeler

Recently I spent a good bit of time trying to figure out how to do mullions on irregular surfaces using McNeal’s Rhino software. There really wasn’t any good information on a way to do this posted online, so I’ve included my technique below for anyone who needs it.

I started by trying to do a series of fins (curve offset in the direction of the normal of a surface) but it couldn’t, without some scripting, be batched. So I abandoned the idea…

I also considered using Revit, but the surfaces were a bit complex and the solution Revit presented was not so elegant – a disappointment I had anticipated. There is a good video on Revit/Rhino workflow if you’re interested here (thanks Jeremy).

To get a good window mullion, including size control, the best way to go about it is by first applying a window mullion pattern to a UV curve, applying the curve to the surface, and offsetting the surface (thanks Jeremy) using both directions and volume capped options enabled. Just extrude the mullion half of what the total width is and because it will extrude in both directions the mullion will be expressed on both the inside and outside of the curtain wall.

For the sake of the tutorial, I’m going to assume that you know about UV curves in rhino. I wrote a tutorial on UV curves for a class I had last semester – I’ll try to post it later as another tutorial sometime in the near future.


Step Null: Starting Condition

 01 Surface Condition


Step One: Create Mullion Pattern on UV Curve

To create a UV Curve, go to Curve –> Curve From Objects –> Create UV Curve

Create a pattern based on the height of the mullion. Array the pattern to save time if necessary. Also be sure to give the mullion pattern a sill/header mullion condition on all sides.

  03 Pattern


Step Two: Apply UV Curve

Curve –> Curve From Objects –> Apply UV Curve

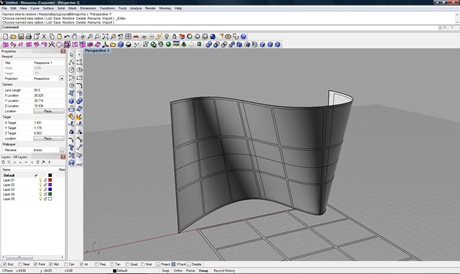
05 Applied UV Curve Condition


Step Three: Split All Objects

Just type Split into the command bar and select both the old surface as well as the new mullion surface. For the split to work best, only split one surface at a time, and try not to select geometries which extend past the surface edge. To fix the “extended geometry” condition, simply trim the geometry by using the surface as a cutting plane.


Step Four: Layer Control

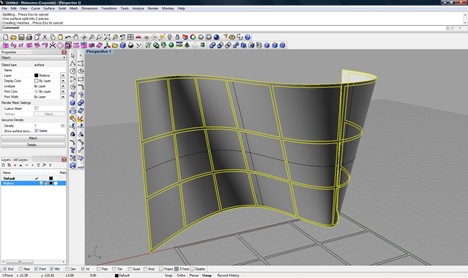
Be sure to move the polysurface to a mullion layer before and after the extrusion.

06 Layer Control

Step Five: Extrude Mullion Surface (both directions = yes, capped = yes)

Again, ensure that the surface and the mullion layer are separate. This will help in the future as you work with multiple non-regular curtain wall conditions.

Final Results:

07 Final Product

_________________________________________________________

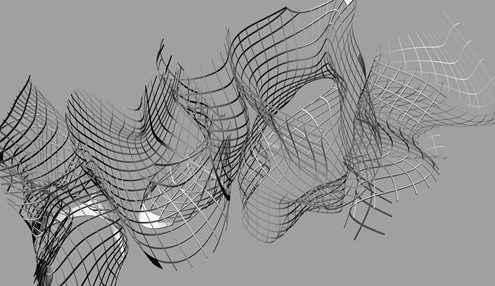
And that should be it. See the curtain wall condition in one of my current projects to get an idea of how convoluted these situations really can become:

Curtainwall Condition

If you need the corresponding file from above, or have a question, feel free to shoot me an email, or leave it in the comments-