Saturday, December 1, 2012
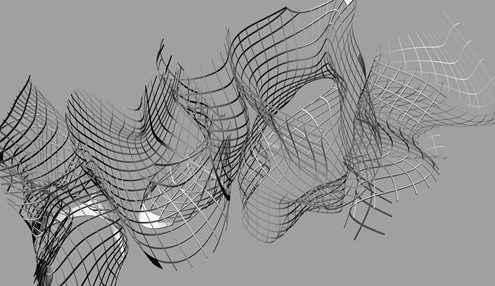
Rhino: Goat
If you have, don't be shy - I am curious regarding the output and your thoughts. Thanks!
Wednesday, August 1, 2012
Import NURBS geometry cleanly from Rhino into Maya
Moving geometry in and out of Maya can be difficult, especially moving geometry in a useable format between the two platforms. There have been attempts to move the geometry through a number of mediums, including .iges, .obj, .dwg, etc. I’ve found the majority of these to fall short in the face of highly articulated geometries. Rhino provides certain benefits over Maya, such as grasshopper and fabrication compatibility, but lacks much of the mesh control provided for in Maya.
In order to maintain the fidelity of the NURBS geometry, knowing that the geometry will be further worked in Maya, do the following:
- Select NURBS object in Rhino. Run the command : ExtractControlPolygon. Move the polygon mesh away from the original NURBS geometry.
- Export the object out of Rhino in the “wavefront OBJ” format.
- Open the object in Maya.
- Subdivide as needed. Done.
The upper screenshot below is of a surface in Rhino. The left geometry is a NURBS surface. The right geometry is the control polygon.
In the lower image is import geometry in Maya. The mesh on the right is the control polygon imported from Rhino. The surface on the right is a subdivided mesh straight from the control polygon (press “3” in the software…). Note that they are identical.
The only shortcoming of this method is that it only exports a single surface at a time, so if there is any mass to your NURBS model, each surface will need to be extracted and exported separately.
Sunday, June 24, 2012
Prezi / Linked In
So I have begun using Prezi to give presentations because it works so much better than slideshow software (ie, powerpoint) at presenting architecture. I can zoom out, compare two areas side by side, insert media, etc. The information I reveal from item to item is more seamless, and the ability to compare between various points in the presentation on the fly (for questions, etc.) is amazing.
At the same time while I’ve been wary of jumping on the social networking bandwagon, I finally broke down and signed up for LinkedIn. While I am cautiously optimistic at this point, it seems to provide a bit more use than the fractured direction of facebook.
LinkedIn Profile: http://www.linkedin.com/pub/ryan-collier/51/963/853
In any case, to get the effect of both Prezi and LinkedIn, check out the prezi I stumbled upon which discusses the use of LinkedIn using the Prezi presentation style. While I doubt I will implement all the suggestions, it’s a good presentation of making the most of LinkedIn.
Thursday, February 3, 2011
spulenkorb
Team Members: Ryan Collier | Michael Tomaso | Gabriel Esquivel
The project was awarded an honorable mention in the REPEAT competition organized by TEXFAB November 2010.
There is a vast precedent in fabrication projects that deal with the idea of weaving, however within those projects there are more specific techniques. This project concerns itself specifically in the spiral or coil. In "Tooling" Aranda/Lasch describe this technique as, “the spiral (which) is not so much the shape as the evidence of a shape in formation."(1) This idea implies constant movement as a desired effect - something architecture has historically aspired to. Aranda/Lasch continue the argument in terms of spiral lattices as multiple woven points weaving producing stability: this gives the potential of using the technique as away to assure the structure of the project’s form. To employ such a technique, one would have to use materials and tools that provide a ribboning or woven methodology.
When we began to research more about weaving techniques we looked at“coiled” baskets and “plaited” basketry. Baskets are categorized by Technique; we found diagonally plaited as producing a more contemporary effect. At the same time, coiled baskets provide more stability in that they employ a technique
of bundle strands or rods stitched into a spiraling oval or round form with a thin, flexible element to create a coil. Numerous variations of stitch types and embellishments (such as imbrications) can afford a wide range of possibilities.
Spulenkorb is a combination of both techniques. Spulenkorb literally means a coiled or spiral-form basket. The interest in a coil-spiral-weaving technique is the idea of movement - a propelling force that make things operate - a pattern and certain geometries referential to physics and chemistry as well as in popular culture, music, and film - all while being sensitive to architectural logic of elegance in structure and form.
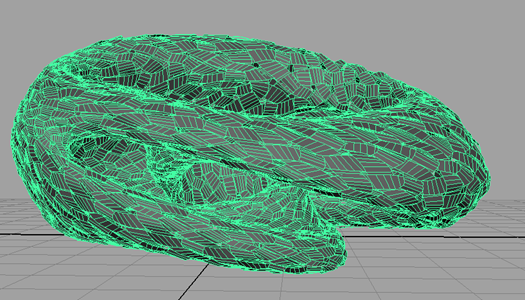
The initial form then was conceived as a mobius rind (2), a variation of the pure mathematical "strip". For initial investigation we worked with the tool TopMod(3), a topological manifold mesh modeler which handles multi-genus geometries, to model the rind. We then continued to develop the mesh in Maya to include vortex apertures and variable, ornamental perforations, in an effort to test therobustness of the weaving algorithm.
Once the basic geometry was developed, the project was then passed through a series of subdivision routines to help determine which might provide the type of weaving that we ultimately desired. The team selected a base cubic pentagonalization routine because of the flower-like aperture treatment and the relationship between the various ribbons. There was also a strong consideration of the necessity of the final algorithm: weaving the mesh required inclusion of mesh based knots and links. These links can be represented in various ways, and can be passed through a subdivision-extrusion-reevaluation procedure to produce the desired woven effect. The final state of the project includes a series of six continuous ribbons of various lengths. Additionally, none of the ribbons are straight, nor do they maintain their width - these variables are determined by the geometry, the algorithm, and the further parametric variables provided in the algorithm. Each ribbon includes several hundred developable surfaces, all with a unique four- sided condition. It is because of these specificities, and because of the recent development of the tools that such a project can be conceived, digitally or otherwise.
In conclusion, that while up to this point much of the study in digital fabrication research has been based on tessellated surfaces typically derived from some abbreviation of the catmull-clark subdivision routine, this proposal supersedes these current studies by providing new solutions and challenges through the use of emerging tools (such as topmod) and algorithims (such as cubic pentagonalization and weaving) providing an opportunity to experiment and new directions.
1. Aranda, Benjamin. Tooling. Aranda/Lasch. Pamphlet Architecture 27. Princeton Architectural Press. Spiraling. P 12.
2. Akleman Ergun. Cyclic Plain Weaving on Polygonal Mesh Surfaces with Graph Rotation Systems. Siggraph 09.
3. see topmod3d.org for more information
Be sure to check out the project on suckerpunch-
Thursday, June 3, 2010
Maya to Rhino translation in real time
[LAN: Maya Fluid to Grasshopper via UDP]
Wednesday, January 6, 2010
Tuesday, August 25, 2009
reading form
Photos courtesy of horhizon.com & suckerpunch
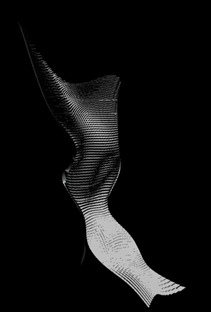
As a continuation from the previous post (and found through my love of suckerPUNCH) this recent project printed aedicules by Johan Voordouw explorers the “conventional modes of architectural expression, text, drawings and models, into a singular spatial formation,” essentially marrying the figural page shape with literal “sls” or plastic 3d print modeling and graphics. The project discusses work surrounding the Villa d’Este in Tivoli – a subject which I’m sure influenced the figuration of the form/shape/graphic/text/whatever.
Now, imagine a portfolio with 3d models, great text, video, graphics, and what not all in one binding. Not that were graphic designers, but the ability to negate abstraction of form (ie, the line/ the 2d condition), in favor of pure form, is so incredibly seductive.
by Voordouw (via suckerpunch):
The project describes an annexed library for the museum of manuscripts at Villa d’Este in Tivoli, Italy. Rather than exploring the configuration of conventional spaces the project sought to explore the library through a series of books, the book becoming an expression of physical and imagined spaces. Using a combination of text, illustrations and SLS models the project formed architectural space on and through the page, an oscillating interplay between two-dimensional and three-dimensional space and experience, one that can only be fully appreciated when flipping cover to cover.
The spaces within the book are hand-carved to blur the boundary between model and paper. The book, first digitally modeled was then physically crafted, the voids forming the context for the content; the models, images and text continually reveal additional information about the intensions of the library creating a link between reading the book and reading the building. This re-forms Victor Hugo’s assertion of architecture as didactic space, a place with continual exploration and discovery.
Monday, August 10, 2009
parametric study – solar articulation/surface aggregation
For this study, I was asked to design a skyscraper who accommodates a system of panelization in which each panel is to be normal to the sun. One could think of these as either solar shades or PV panels. This condition allows for a level of sustainability about tall, topological projects, while still allowing the architect to control form while keeping the surfaces developable.
A number of steps went into solving the problem:
- Planar surfaces where created from the NURBS surface using LIFT Architects Grasshopper Primer.
- I then divided each panel into a 2x2 grid using U & V values, which yielded 9 points. I then extracted the corner points (1, 3, 7, and 9) and the middle points (5) into two distinct lists, or arrays.
- To create surfaces normal to the sun, I used trigonometry based on the vectors between the sun and the center/corner points of the original diagrid pieces. Because the magnitude (length) of the pre-existing vectors are known (both to the corners and to the center) as well as the angle between those vectors, a cosine function can be used to determine planar points along the corner vectors. Basically, as long as all end points of all lines draw a perpendicular vector to the existing central point vector, the surface, by definition, will be planar (see diagram).
GIVEN
- Once I had the four new corner points, I used a ‘surface from four points’ component and baked the geometry into Rhino.
Because of the parametrics of grasshopper, one can view all possibilities of each panel, the number of panels, change the solar path relative to the building, etc.
To find the solar data I used an excellent excel spreadsheet put out by Greg Pelletier through the Washington State Department of Ecology (titled solrad.xls v1.2). It can be found on the web here.

Images
(panels fixed in July position except in the video)
If the panels were to move in relation to the sun, it would look something like this (July solar data, of course):Interior Perspectives (January vs. July)
Wednesday, April 8, 2009
A Rhinoceros with Fins on Stairs
I was asked today to do a short tutorial on a little known yet valuable command in Rhino called Fin.
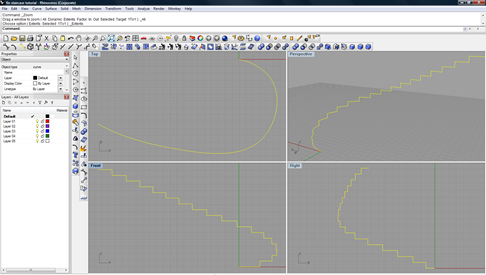
Fin, according to the help manual, “Creates a surface by extruding a curve on a surface, normal to the surface.” The practical example below will use the fin command to create stair a simple staircase based on bent geometry.
Problem: This technique will not work with an applied UV curve nor geometry which has been oriented to a predefined surface; in both instances the threads on the staircase become skewed. When offsetting a polyline which has been through bend, etc. the offset will not be fully realized, so offset/loft wont work either.
Also note that this is not for wild, topological stairs (which may or may never be used/built/whatever), but is for using very controlled geometries to create stairs which someone on a cane might use.
1. Create staircase geometry (lines). JOIN them all together as one line.
2. Manipulate by the ROTATE/BEND/TWIST commands to desired state.
3. Use interpolated curves along the top edge of the stairs, so that the curve your creating follows the curve of staircase. Copy this new curve vertically above and below the stair geometry. Connect these two new lines with single straight line. SWEEP2 the two curves and the straight line to create a surface parallel but larger than the new staircase geometry.
4. FIN the staircase curved polyline. Select the surface created in step 3 as the surface as the “base surface.”
5. Erase/Delete the construction curves and surfaces to complete staircase.
Also know that you can build stairs using Grasshopper, if that’s your thing.
Leave questions in the comments-
Tuesday, April 7, 2009
A Short Criticism of RealFlow
![[image[27].png]](https://blogger.googleusercontent.com/img/b/R29vZ2xl/AVvXsEhFmEE_k7MVvpLPEC45TSPk4619-JtVs-zzo_APCsHTWrlbX1r8z5uNnl86bnxgq4GoBiFJRBxguUzy36Zbd99l9L_c8DoL8470i2UxIIvVz9KOgVM5QYM-FdtBPWUYS52p_81P6B4P7gM/s1600/image%5B27%5D.png) Just as fitting a round peg through a square hole can yield obstacles, using particle simulation software to model architectural environments can sometimes prove aggravating. I have a few criticisms:
Just as fitting a round peg through a square hole can yield obstacles, using particle simulation software to model architectural environments can sometimes prove aggravating. I have a few criticisms:
1. The OBJ export always leaves holes in the mesh (same with the LWO export). Even after using extremely fine polygon sizes and using the fill all mesh holes script in Rhino, the model still has holes. Needless to say, you can’t send it through for rapid prototyping…
2. When you insert a mesh, you can’t turn off the mesh for further particle creation: every subsequent scene exports the corresponding mesh, which can take forever. To fix the problem, you could delete the mesh, but then you loose the node parameters set up for both the mesh and the fluids inside the mesh. If there was a way to temporarily “turn off” the mesh object (a la Rhino/AutoCAD/etc.) it would essentially solve the problem. I have a solution for this, but its not very elegant. I’ll try posting it in a later post.
3. RealFlow has the elegant interface help solution which allows for you to highlight a node parameter and press F2 to pop up a short help summary of the parameter. However, if you hit F1 a tiny window pops up and, upon closing said small window the whole program crashes.
4. When you close RealFlow, the program acts like its crashing. Not a bid deal, but it makes you feel uneasy about using the software for in-production work.
Monday, April 6, 2009
RealFlow and Architecture

Modeling architecture in RealFlow is like dating a really crazy girl: sure its fun (for awhile), sometimes it’ll blow your mind, but often time the culmination of the consequence (which is really what Real Flow outputs) is frustrating. Therefore, I’ll be posting up some tutorials and advice to help out anyone else who might be interested in creating the same sort of effect without so much of the heartache.

To move about the modeling environment, hold down ALT and use the mouse to move about (similar to MAYA).
There are four main Nodes (or manipulators) in RealFlow: objects, daemons, meshes, and emitters: objects are rigid/soft bodies, daemons influence particles during animation, emitters emit particles, and meshes mesh the particles according to very specific parameters. There are four main parameters (among sixty or so) which are key in controlling the fluid mesh: polygon size, filter->relaxation (after filter method is set to “yes”), blend factor, and radius (thanks Gnomon Workshop). All values are scale dependent. Change and rebuild the mesh to see the results.
Other than that, I feel that the interface is fairly simple, comparable to programs like Google SketchUp or the new Rhino OSX interface. You can script fluids, but with what I am working on this would be overkill.
Anyway, here’s a few screenshots to give you an idea of the software’s potential:
I know this is brief, so if you have any questions or something to add, post it in the comments-
Wednesday, March 11, 2009
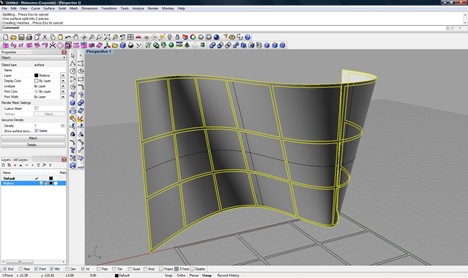
How To Create a Curtain Wall in McNeal’s Rhino modeler
Recently I spent a good bit of time trying to figure out how to do mullions on irregular surfaces using McNeal’s Rhino software. There really wasn’t any good information on a way to do this posted online, so I’ve included my technique below for anyone who needs it.
I started by trying to do a series of fins (curve offset in the direction of the normal of a surface) but it couldn’t, without some scripting, be batched. So I abandoned the idea…
I also considered using Revit, but the surfaces were a bit complex and the solution Revit presented was not so elegant – a disappointment I had anticipated. There is a good video on Revit/Rhino workflow if you’re interested here (thanks Jeremy).
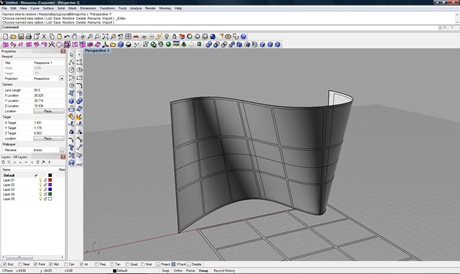
To get a good window mullion, including size control, the best way to go about it is by first applying a window mullion pattern to a UV curve, applying the curve to the surface, and offsetting the surface (thanks Jeremy) using both directions and volume capped options enabled. Just extrude the mullion half of what the total width is and because it will extrude in both directions the mullion will be expressed on both the inside and outside of the curtain wall.
For the sake of the tutorial, I’m going to assume that you know about UV curves in rhino. I wrote a tutorial on UV curves for a class I had last semester – I’ll try to post it later as another tutorial sometime in the near future.
Step Null: Starting Condition
Step One: Create Mullion Pattern on UV Curve
To create a UV Curve, go to Curve –> Curve From Objects –> Create UV Curve
Create a pattern based on the height of the mullion. Array the pattern to save time if necessary. Also be sure to give the mullion pattern a sill/header mullion condition on all sides.
Step Two: Apply UV Curve
Curve –> Curve From Objects –> Apply UV Curve
Step Three: Split All Objects
Just type Split into the command bar and select both the old surface as well as the new mullion surface. For the split to work best, only split one surface at a time, and try not to select geometries which extend past the surface edge. To fix the “extended geometry” condition, simply trim the geometry by using the surface as a cutting plane.
Step Four: Layer Control
Be sure to move the polysurface to a mullion layer before and after the extrusion.
Step Five: Extrude Mullion Surface (both directions = yes, capped = yes)
Again, ensure that the surface and the mullion layer are separate. This will help in the future as you work with multiple non-regular curtain wall conditions.
Final Results:
_________________________________________________________
And that should be it. See the curtain wall condition in one of my current projects to get an idea of how convoluted these situations really can become:
If you need the corresponding file from above, or have a question, feel free to shoot me an email, or leave it in the comments-


